
Technical Tip
To create temporary items, the Allow Temporary Items Addition field on the User File Update screen - Main tab must be set to Yes – see "Maintenance - Edit UserIDs - 1. Main".
If your user security is set up to allow the creation of temporary items during transaction processing, Micronet displays a Create Item button to the right of the Item Number field on the Enter Invoice Line screen, or the Enter Invoice Line screen - General tab if your company is configured for supply chain procurement.
|
|
|
Technical Tip To create temporary items, the Allow Temporary Items Addition field on the User File Update screen - Main tab must be set to Yes – see "Maintenance - Edit UserIDs - 1. Main". |
To create a temporary item:
Refer to "Entering Invoice Lines - Standard" or "Enter Invoice Line - General (v2.8)".
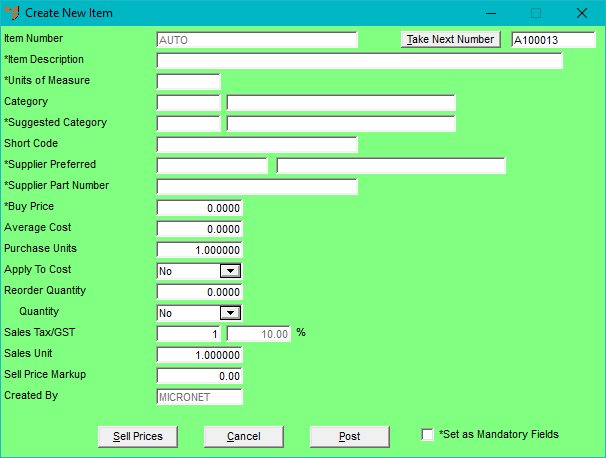
Micronet displays the Create New Item screen.
|
|
Field |
Value |
|---|---|---|
|
|
Item Number |
Enter a unique item ID for the temporary item. Micronet displays AUTO by default so a new ID is automatically generated. Alternatively, you can select the Take Next Number button to take the next available item ID. |
|
|
Item Description |
Enter a description of up to 75 characters for new items. This description is printed on invoices, picking slips and other relevant documents. |
|
|
Units of Measure |
Enter the unit in which the item is measured, e.g. EA (each), LM (lineal metres), SM or M2 (square metres), cartons, etc. You can also press spacebar then Enter to select a unit. Units are defined in the Unit Recognition table – see "File - Unit File Update (v2.8)". |
|
|
Category |
Enter the temporary item category (e.g. TEMP). This provides an alternative means of grouping items for discounts, reports and inquiries. You can also press Tab or Enter to select a category. The temporary item category must already be set up in your Product Category master file – see "File - Product Category". |
|
|
Suggested Category |
If you want to suggest a different product category for the temporary item, enter the category. You can also press Tab or Enter to select a category. The suggested category is displayed in the Suggested Category field for the temporary item in the Inventory master file – see "File - Inventory - Extra". |
|
|
Short Code |
Some companies use short barcodes to identify and search for items. If your company uses short barcodes, enter the short barcode for this temporary item. Users can search by this short barcode whenever the Item Selection screen is displayed for selecting items. |
|
|
Supplier Preferred |
Enter the ID of the preferred supplier for this item. You can also press spacebar then Enter to select a supplier. You can store multiple alternate suppliers against the item – see "File - Inventory - Supplier". |
|
|
Supplier Part Number |
Enter the supplier part number for the item. |
|
|
Buy Price |
Enter the buy price for the part. |
|
|
Average Cost |
Micronet maintains the average cost per sales unit. |
|
|
Purchase Units |
If you purchase items in a quantity/measure different to the one in which the items are sold – e.g. purchased by tonnes but sold in lineal metres, or purchased in packets but sold as each – you enter a purchase unit conversion factor. This tells Micronet how to calculate the number of sales units for each purchase unit. For example, if you purchase by the carton and 1 carton contains 12 units that you sell individually, you would enter 0.083 (1 divided by 12). If you purchase by the tonne but sell in lineal metres and 1 tonne equals 50 lineal metres, you would enter 0.02 (1 divided by 50). If you enter anything other than 1 in this field, you also need to make selections in the Apply to Cost and Quantity fields. If you are setting up a coil item in MRF, set this to tonnes per metre (used to convert tonnes to lineal metres on receipt of the coil from your supplier). |
|
|
Apply to Cost |
If you want Micronet to use the Purchase Units quantity you entered to convert the purchase order cost to the cost per individual sales unit (e.g. pallet to box, tonnes to lineal metres, boxes of 12 to individual pens), select one of the following options:
|
|
|
Reorder Quantity |
Enter the minimum or recommended order quantity for this item. This could relate to one, a box, a pallet, etc. of products. |
|
|
Quantity |
If you want Micronet to use the Purchase Units quantity you entered to convert the quantity to the individual sales unit quantities, select one of the following options:
|
|
|
|
Technical Tip The options you select in the Apply to Cost and Quantity fields work in pairs. Valid pairs are:
|
|
|
Sales Tax/GST |
Enter the sales tax or GST percentage applicable to this item. The default is 10%. Alternatively, if you have set up tax tables, enter the appropriate table number for this item – see "Edit Company - Edit - Tax Tables". |
|
|
Sales Unit |
Enter the quantity in which the item is sold. This relates to the Units of Measure you entered above. For example, if the item is sold individually, you would enter 1. If it is sold in quantities of 100 (e.g. $3.00 per 100), you would enter 100. |
|
|
Sell Price Markup |
Micronet defaults the markup percentage on the item to 160%. You can change this if required. |
|
|
Created By |
Micronet displays the user name of the person who created the temporary item. |
|
|
Set as Mandatory Fields |
If you tick this box, the fields on this screen that are marked with an asterisk will be mandatory, i.e. Micronet will not allow you to add the temporary item until a value has been set in all of these fields. The mandatory fields are Item Description, Units of Measure, Supplier Preferred, Supplier Part Number and Buy Price. When you tick this box, the value will be saved to the Registry / your user profile so that it will always be ticked when you create a temporary item in the future (until you untick it again). |
|
|
|
Technical Tip If you don't want users to be able to change the Set as Mandatory Fields option, their Registry / user profiles should be locked (i.e. read-only). They can still tick or untick the box on the screen but Micronet will check the Registry / user profile setting and will not allow them to save the temporary item if that field is ticked and they have not entered all the mandatory fields. |
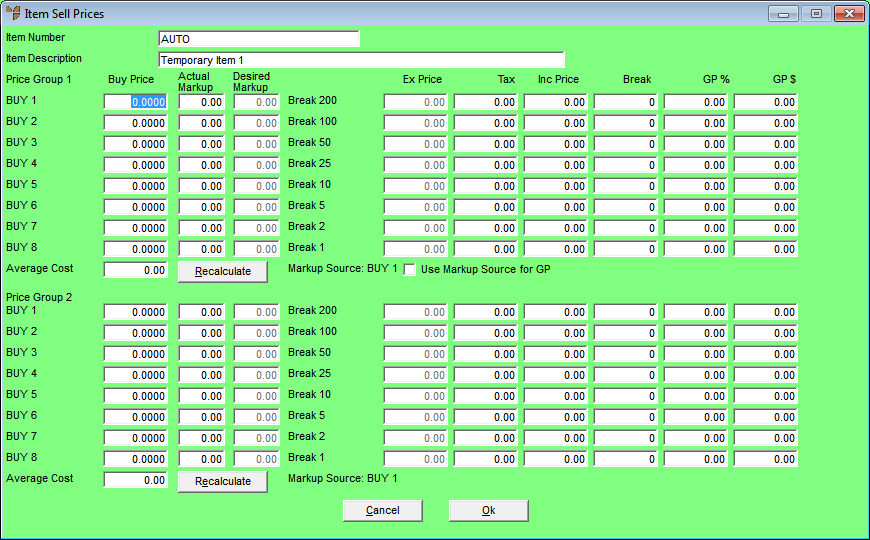
Micronet displays the Item Sell Prices screen.
Micronet redisplays the Create New Item screen.
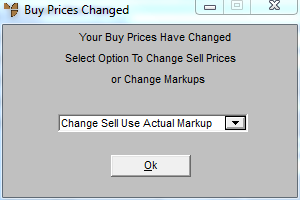
Micronet displays the Buy Prices Changed screen.
|
|
|
Technical Tip Whether this screen is displayed depends on the option selected in the Default Markup Method on Buy Change field on the Markups Configuration screen – see "Edit - Program - Markups". If an option ending in "Don't Ask" is selected, this screen will not be displayed. |
Micronet redisplays the standard Enter Invoice Line screen, or the Enter Invoice Line screen - General tab.
|
|
|
Technical Tip Temporary items are automatically deleted during MDS End of Month processing if the item's stock on hand is zero, there are no pending transactions (i.e. purchase orders), and there has been no other activity on the item (e.g. sales). Note that if a temporary item has been included on a job in MJC, it will never be deleted as MJC needs permanent access to the item details. You can set the minimum number of days a temporary item must be idle before it is deleted during EOM processing on the Inventory Configuration screen – see "Edit - Program - Inventory". (2.8 feature) Once a temporary item is deleted, it is no longer accessible from the Item Selection screen or inventory listings, although history can still be viewed in relevant sales and purchasing reports. |